Auto detailing is a deluxe treatment that focuses on cleaning the smallest details of your vehicle and taking it from looking good to like new. There are many different levels of detailing that touch up the parts of your car that are not so perfect. If you want to learn more about detailing, or if you can do it yourself, call Waxman of Tristate Car Detailing Center to set up an appointment with an expert. They not only offer top-class interior detailing and exterior detailing services but also provide valuable instructions on washing your car so that you have a spotless vehicle in record time.
What Is Car Detailing All About?
Many people use the terms car detailing and car washing interchangeably, but there are major differences between the two. While a car wash is what it indicates, auto detailing goes much deeper than cleaning the car inside out. Detailing begins with washing and vacuuming and moves on to thorough cleaning using more specialized tools and car detailing supplies. This might even include removing parts of the car to get into cracks and crevices that cannot be reached by hand.
The detailers also apply specialized products that enhance your car’s appearance and protect it from future dirt and damage once they are through with the cleaning part. As a result, your vehicle looks and smells just like new, even if it is a decade old.
Stages of detailing that involve several different techniques and supplies. The better you understand how they go, the better you will take care of your vehicle and keep it in top shape.
If you’ve been looking for quality “car wash near me,” call Waxman of Tristate Car Detailing Center and learn more about our services!
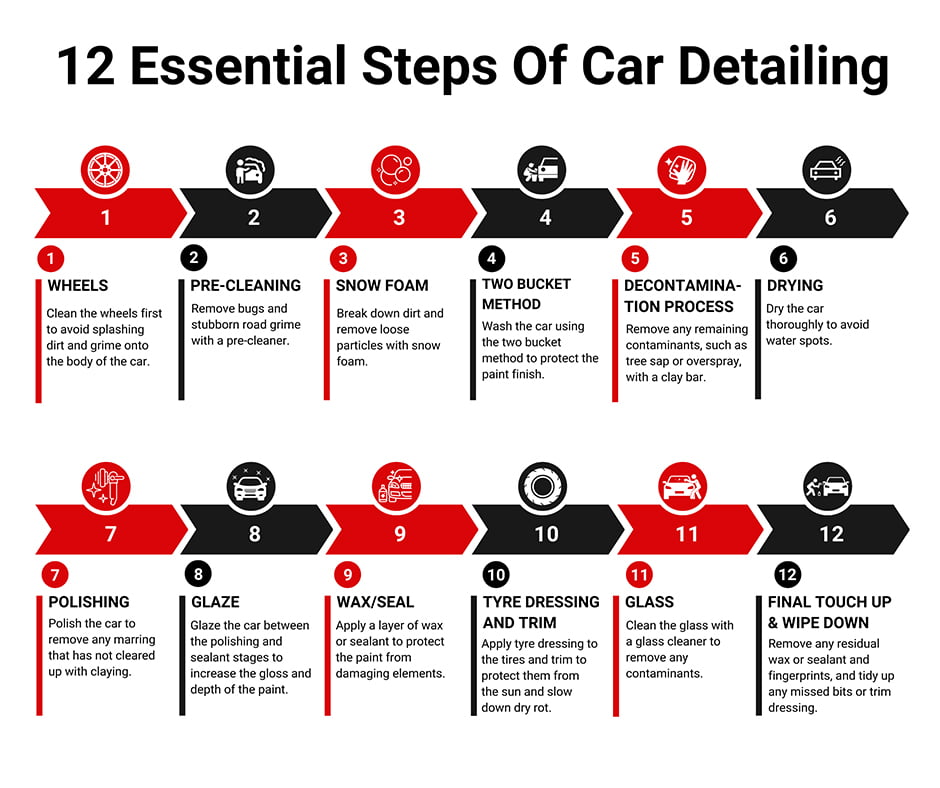
Here are the 12 steps of detailing to help you get started if you are new to this:
Step # 1 – Wheels
Always start the detailing process with the wheels. If you leave the wheels for later, you might splash road grime onto the body of your cleaned car.
As wheels are the dirtiest part of the car and accumulate a lot of debris and grime, they require a pre-soak with a quality wheel cleaner for extensive cleaning. Also, you will need brushes to access hard-to-reach areas to clean them, along with other washing supplies to get rid of all the contaminants. There are specific detailing products for wheels that restore their true form and make them look like new again, without making them greasy.
Related: How Does Work the Powder Coating of Alloy Wheels?
Step # 2 – Pre-cleaning
A pre-cleaner is a must to start with detailing. Get a pre-cleaning formula specially designed to remove bugs and stubborn road grime from the car surface. Find one that is gentle on car wax and sealant layers and comes out on its own with repeated washes. Avoid harsh, chemical-laden cleaners as they can damage your car paint and body. Spray the cleaner on the lower areas of the car as well as any other bug-splattered parts.
Step # 3 – Snow Foam
Snow foam effectively breaks down stubborn dirt and removes any loose particles from the vehicle before you wash it physically or scrub it, with contact wash. Removing as much dirt as possible before contact washing reduces the likelihood of swirl marks on the paint finish.
Step # 4 – Two Bucket Method or the Contact Wash
It is now time to wash the cash. Using a good quality car shampoo is necessary to reduce the likelihood of marring, light scratches, or swilling as the lather will help the contaminant parts absorb into the mitt as it goes across the car surface.
Fill one bucket with wash solution and the other with plain water. Apply wash solution to the vehicle, washing down from top to bottom in small sections. Rinse the first mitt in a soap water bucket before taking the fresh water solution to the car. This method ensures you don’t contaminate your wash solution, and only clean, fresh water is used on the car.
If the car still has traces of old wax, use dish soap in the bucket of water to wash it off. Two bucket method effectively protects the paint job on your vehicle. Use one bucket to rinse with plain water and the other one for washing and having your soap and water mixture. Get a good wash mitt for the best results.
Step # 5 – Decontamination Process
Spray on an iron dissolve first to remove any ferrous contamination, such as industrial fallout and rail dust that is attached to the paintwork. After this, use a solvent tar and glue remover to soften any tar that may be stuck to the paint. At this stage, you have to re-wash the vehicle or at least the areas you have treated with the solvents, as they melt clay bars and may also interfere with the next detailing step.
Detailing clay is easy to use and delivers brilliant results. Just rub a block of clay over the paintwork using a slip or clay lubricant, and it will do all the hard work for you, getting rid of any remaining contaminants, such as tree sap, or even overspray easily. After being through the last two stages, there will not be much for the clay bar to pick up, but it is a great way to ensure thorough cleaning. Wash and rinse your car again once the claying process is complete.
Step # 6 – Drying
Drying your car after it has been washed is very necessary to avoid water spots and marks. You must work quickly while being thorough, or it will leave streaks on the vehicle. Start at the top of the vehicle and work your way down. Drying it panel by panel is the right way to ensure each area of the car is streak-free by the time you are done.
Using a blow dryer to dry your car is also a good idea, but if you don’t have one, you can also use thick microfiber towels to do that job. If you notice any water spots afterward, detailers can help you clean them up.
Step # 7 – Polishing
Polishing is recommended after claying to get rid of any marring that has not cleared up with claying. You can select your compound and buffing pads for polish. Polish can be applied either by hand or you can use a machine polisher. While polishing by hand will give you a good finish, it does not deliver as good results as using a machine polished.
There are products for both types of applications. If you are detailing your car for the first time, it is best to polish it by hand, as using a machine without prior experience is not recommended. You could end up burning through the paint on the car, which may result in a full paint spray or even a whole car spray.
Step # 8 – Glaze
Glazing is done between the polishing and sealant stages to increase the gloss and depth of the paint. It is a non-abrasive acrylic, polymer-enriched product designed to enhance paintwork and reduce the appearance of fine swirls on the vehicle body. Glaze works best for darker colors and metallic finish.
Apply some glaze to your polishing rag and polish thoroughly over the exterior of your vehicle. One coat is sufficient for maximum results.
Related: How Much Does Powder Coating Your Car Wheels Cost?
Step # 9 – Wax/Seal
Waxing or sealing is one of the most significant steps you should not miss when detailing your car. Applying a layer of car wax or seal protects all the hard work you have been doing to clean your vehicle. They bond to the paint and shield your vehicle from damaging elements for several months.
When you are applying sealant, try and stretch it as thin as possible. Take a small amount onto the center of the foam or pad and spread it as thin and evenly as possible in circulation motions. Allow each coat to cure and bond to the paint for at least one hour. Waxing your car is similar to applying a sealant. Less is more and delivers great results. It is best to wax in sections and leave it to dry or cure for at least an hour and up to 24 hours.
Step # 10 – Tyre Dressing and Trim
By this time, your wheels and tyres should be dry. Now, it is time to take care of trim. Spray the tyre dressing on a sponge and apply it to the tires or spray it directly on the tire surface in thin even coats and use a microfiber cloth to wipe it.
Some products get the plastics back to their original colors and make the tires look elegant without making them greasy. They leave a nice finish and also protect them from sun damage, and slow down dry rot. Move your car a few feet away after applying the first coat of dressing.
Step # 11 – Glass
Paying special attention to glass is necessary as some contaminants do not go away easily, and stick around to ruin your car’s image, such as light scratches, fingerprints, grease, or water spots. Use a good quality glass cleaner to get rid of these nuisances. Getting a newspaper instead of a cloth can help to make your glass shine and get rid of all the window streaks. Do not use ammonia-based glass cleaners if your windows are tinted.
Step # 12 – Final Touch Up & Wipe Down
Final touch-up and wipe-down is the most crucial step that will finish up all your hard work and help to see how your vehicle looks. Good detailing is all about getting rid of any potential residual from waxing or sealing as well as any fingerprints left unintentionally as well as generally tidying up missed bits or trim dressing. Finishing touches are often underestimated or overlooked, but it can take up to an hour to fix them up, especially for that showroom finish every car owner wants.
Detailing is an important task that needs attention to detail and knowledge of how to do things right. You must make an effort to learn more about detailing to do the best for your vehicle and enjoy outstanding results.
Detailing a car takes practice. You can only see, feel, and smell the results of a freshly detailed car by learning what detailing is and how it works for your vehicle. The experts at Waxman of Tristate Car Detailing Center understand how sensitive you are when it comes to your vehicle and its beauty and make every effort to make you happy. They answer the questions you have regarding detailing and also clear any doubts regarding the methods of cleaning or procedures included.
