A vinyl car wrap is an adhesive-backed plastic sheet, available in metallic, reflective, matte, gloss, pearlescent, color-changing, even factory-matching, and Pantone colors. With beautiful and complex patterns and combinations, you can look forward to wrapping your vehicle in stunning colors and textures that reflect your personality and mood. Call Waxman of Tristate Car Detailing Center and find out how you can vinyl wrap your car and care for it. The experts will share the full DIY guide with you and help you decide if you are ready to take on this project and give your car a new look with this innovative technology.
A vinyl car wrap is a blend of polyvinylchloride (PVC) polymer, which is combined with various additives to make it flexible, and resistant to ultraviolet light and color. These elements are blended, cast onto moving sheets, then baked and cured. A vinyl wrap can give your car a completely different look and also protect its paintwork. It is a thin film applied to all the panels, curves, and each and every corner of the vehicle, which gives a car a new color and finish. Read on to learn in detail about car body vinyl wrap, what the application process entails, and if you can vinyl wrap your vehicle.
How Does Vinyl Car Wrap Technology Work?
Due to advancements in vinyl car wrap technology, it is no longer an expensive or exclusive product anymore. Now, you can completely change the look of your car, all by yourself if you focus on the job and get the right supplies and tools that make the task easy. These tools are easily accessible and require no special licenses, training, or experience.
Basic color changes or even multiple colors are easy to handle, but if you want custom graphics, prints, or finishes, taking your car to a professional installer is a great idea. The trained and experienced installers help you enjoy stunning car looks at a reasonable cost.
Vinyl car wrap is a temporary solution to enhance your car looks. With proper care, a quality wrap can last five to seven or even ten years if you are really cautious about your car. It is a perfect solution for car owners who want to change their vehicle look again in a few years or want to sell their car. The vinyl can be removed easily without affecting the original finish at all. You will notice that the original paint job is even better once the vinyl is removed because it blocks paint-damaging UV rays, and other contaminants from affecting your vehicle body, thus enhancing its resale value.
Related: Ceramic Tint vs Regular Tint
Vinyl vs. Paint – Pros and Cons
Both vinyl and paint can change the look of your vehicle but in different ways with their unique advantages. Paint job has been the standard way to change vehicle color for decades, but this requires a professional touch, not to forget proper tools and equipment to get the showroom finish you crave. Also, it can be a lengthy and time-consuming process. Multiple or special colors and finishes, graphics, or custom designs call for a specialist’s touch, which increases time and cost.
On the other hand, vinyl vehicle wrap gives you a chance to change your vehicle’s appearance without spending too much. You can either seek expert assistance or do it on your own if you are ready for a DIY job. You don’t require extraordinary licenses, preparation, and experience to do it as long as you have the tools and know what to do. You may need professional help if you seek custom illustrations or prints, and they may increase the overall cost as well, but all things considered, it is a great option to give your car a new life.
DIY Full Car Vinyl Wrap Guide – How to Do It Right?
You can vinyl wrap your car by yourself, but it is a task that requires patience and great attention to detail. Although it is not impossible, it is not easy either. However, more resilient vinyl, better adhesives, and air-release technology give you a chance to do it right. You may need an extra pair of hands for holding larger sections of vinyl wrap, to pass on tools, and to keep the worktable clean for best results.
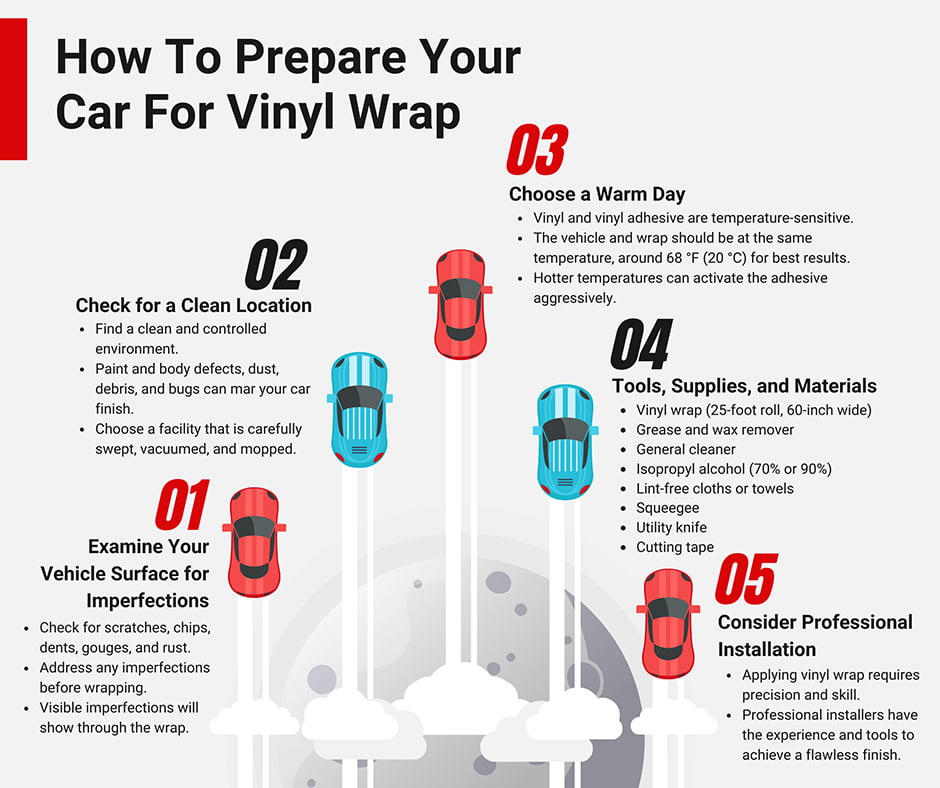
How to Prepare Your Car for Vinyl Wrap?
Examine Your Vehicle Surface for Imperfections
Check your vehicle surface before you start the wrapping process to see if the body and paint job are smooth. Minor scratches do not pose a problem, but chips, dents, gouges, and rust can cause problems with vinyl wrap. It is essential to know that if the wrap is bonded to the defective surface, it will greatly increase its visibility. In case the wrap fails to stick to the defect, it will bubble or tear, ruining the wrap job. It is necessary to take care of these imperfections before wrapping your vehicle.
Check for a Clean Location
You need a clean and controlled environment to keep the dust out from under a wrap, so it is necessary to find a clean location. Paint and body defects, dust, debris, and bugs can mar your car finish. You must look for a facility that is carefully swept, vacuumed, and mopped to achieve optimal results.
Choose a Warm Day
Remember, vinyl and vinyl adhesive are temperature-sensitive. The vehicle and wrap should be at the same temperature, around 68 °F (20 °C) for best results. Choose a warm day for taking your car for vinyl wrapping. Colder temperatures can cause the vinyl to brittle and even tear, and any hotter could activate the adhesive aggressively, making smooth installation difficult. A professional detailer can tell you more about it. Also, they have temperature-controlled environment and a non-contact infrared thermometer to monitor things, which makes it easy to perform the task successfully.
Tools, Supplies, and Materials
An average vehicle requires about a 25-foot roll of 60-inch wide vinyl wrap. Narrow rolls are also available, but this can make the job easy. Grease, wax remover, a general cleaner, 70- or 90-percent isopropyl alcohol, lint-free cloths or towels, squeegee, utility knife, cutting tape, heat gun, infrared thermometer, and cotton wrap gloves are some of the basic supplies needed for vinyl wrapping.
Applying a vinyl wrap requires precision and skill. If you have attempted this task before or tried vinyl lettering or graphics to your vehicle, you must know how difficult it can get. The risk of tears, bubbles, stretch marks, and wrinkles can affect your project and vehicle finish. The best thing to do in this regard is go with professional installation.
Related: The Real Truth About Ceramic Coatings on a Car
Surface Preparation and Planning
Cleaning the Vehicle
Wash your car and clean the entire surface with isopropyl alcohol and lint-free cloths to ensure it is free of contaminants or wax residue. You will find non-wax car wash products that leave your car surface clean, and ready for vinyl wrap bonding.
Remove Obstacles From the Wrap Surface
Removing obstacles like emblems, mirrors, door handles, antennae, or headlights from the vehicle surface can save you time and help you do a better job. You can wrap around them, but it can increase difficulty and affect the vinyl wrap finish. Remove fingerprints or dust from the surrounding areas for better results.
Measure the Vehicle Before Cutting the Wrap
It is a very crucial step. Measure each section you intend to wrap, adding a few inches for handling. Sketch a diagram for your vehicle’s body panels and note the measurements to cut precisely. Remember, you cannot add material if it is cut. If a panel is close to or wider than the widest vehicle wrap, you will have to make a seam. Measure twice and think carefully before cutting the wrap.
Laying the First Sheets of Vinyl
Start With Smaller Sections
Starting with smaller and flatter sections is a good idea, particularly if this is your first DIY project. It will help you build confidence and momentum before you go for bigger parts like a roof or hood. Use your sketch and measurements to determine how much material to cut, using a sharp knife.
Hold the Vinyl in the Air
Remove the backing paper while keeping an even tension on the wrap to reduce wrinkles and creases. The best way to do this is by holding it in the air. Lay the vinyl wrap carefully on the panel, leaving extra material around the edges for manipulating it.
Press Gently for Adhesion
Gently press the vinyl into the center of the panel, keeping tension on the rest of the sheet. Use a squeegee and start from the center in overlapping strokes and work toward the edge of the panel. This will force the air out and bond the vinyl to the panel.
Pressing Out Air and Wrinkles
If you notice wrinkles and bubbles while installing the wrap, peel it back gently and apply heat and tension to stretch it into place. Use the squeegee to work back from the center to the edge for a perfect finish. Curved surfaces can be challenging as they force a two-dimensional object to conform to a three-dimensional surface. Wrapping mirrors, wheels, or interior panels poses the same challenge, but you can do it by stretching right when fitting to curved surfaces.
You can make seams by simply overlapping one piece of vinyl over another. It does not require cutting, but you need to be careful when aligning. It is crucial to prevent snagging and cut the wrap gently to avoid damage to the underlying paint.
Edging and Finishing
Wrapping the edges of the panels is essential for a great finish. Use a utility knife to trim excess materials with a quarter-inch or 2-3 mm of the edge. Heat the edges of the panel with the help of a heat gun and vinyl wrap to at least 212 °F (100 °C), activating the adhesive. A squeegee can help to seal the edges of the vinyl to the panel. If you are applying the wrap around a sharp curve, make sure the vinyl is trimmed before you seal it off.
After you have sealed and set the corners and edges, use a heat gun on the rest of the panel or piece at least 212 °F. It will activate the adhesive on the rest of the vinyl for a long-term bond. Press with your hands and squeegee to ensure the wrap is firmly attached to the surface. At this stage, you may notice bubbles, but they can be popped with a pin or utility blade and pressed down with fingers. Keep a thermostat with you for even heating. It will take about 12 hours for the adhesive to set.
Cleaning Your Vinyl Car Wrap the Right Way
After successfully installing your car wrap, it is time to take care of it. If you look after it the right way, it will last a long time. Depending on the type of wrap you have chosen and your location, a vinyl car wrap can last up to 10 years.
Here are three key steps to keep your vinyl wrap in top condition:
Clean and Shine
Wash your car regularly to prevent excess dirt and grime from building, as stains can damage the vinyl finish. Tough stains can be removed with isopropyl alcohol. It is essential to choose quality cleaning products that protect glossy vinyl finishes and prevent the hazing.
Be Gentle
Gentle cleaning works best for vinyl wraps. Hand wash and dry clean your vehicle to keep the vinyl clean. Use a silicon squeegee to remove excess water before drying with microfiber towels. Do not brush wash, as it can scratch and pull at the edges of your vinyl wrap. Touchless or brushless car washes are the best options. You can also pressure wash on gentle settings, at least 12 inches away and at a right angle to the surface for best results. Avoid using polish and wax products as they can lead to hazing and affect the textured vinyl appearance.
How to Remove Vinyl From Your Car?
Some vinyl wraps can last over a decade, while others only a few years, depending on environmental factors and how well you take care of your vehicle. With time, your vinyl car wrap will face deterioration and may begin to fade or peel. Luckily, removing a vinyl wrap is an easy task. All you need is a heat gun and an adhesive remover to take it off safely.
Steps to removing vinyl from your car:
- Use a fingernail or a plastic scraper to pull the wrap from the edges of the entire panel. It may look deformed and unsightly, but it will be gone within a short time.
- Use the heat gun to evenly heat the wrap surface to about 120 °F (50 °C). Heat will loosen the adhesive, and you will be able to pull it easily. Use a non-contact infrared thermometer to check it is not overheated, as it can leave excessive residue on the surface.
- Pull the wrap away from the edges at a steep angle, tugging it back on itself at 15 to 20 degrees. If the wrap is getting hard to pull, reheat and pull again.
- When the wrap is completely taken off, use specialized label and sticker removers or bug and tar removers to get rid of the remaining adhesive residue on the panel surface.
If you have been thinking about vinyl wrapping your car yourself, you just need a few basic tools, a clean work area, and a patient approach to get started. You can look forward to protecting the original car paint as it blocks the UV light and other harmful elements from reaching the vehicle body. Visit Waxman of Tristate Car Detailing Center to see how vehicles are wrapped and what a vinyl wrap can do for your vehicle. The professionals help you understand how a vinyl wrap is installed, what the process involves, and how you can care for it the right way to make it last as long as possible to ensure great looks for your car.
